Microservices API Integration Automation Testing: BDD With Cucumber JVM

Disclaimer: This blog content has been taken from my latest book:

“Cloud Native Microservices with Spring and Kubernetes”

In cloud native pattern, when we have multiple microservices, which are deployed on multiple clusters in multi-cloud environment, then testing those REST API based microservices is nightmare, because they are talking to each other directly or async way using messaging technologies. Integration testing is a great solution to test use case stories end to end by testing integrated microservices like login authentication, browse and add an item in catalogue, end to end order placement and payment on online eCommerce portal. Integration test cases are expected to be executed after deployment of microservices on QA environments. This phase comes after development phase.

I have designed BDD integration testing framework to test eCommerce microservices with Cucumber JVM, SpringBoot, RestAssured, AssertJ, and JSONAssert etc.

We can create a separate microservice integration test module to run integration test cases of any microservices and execute on QA deployment. It can be configured and integrated with the DevOps CI (Continuous Integration) build pipeline using Jenkins, Bamboo, etc. When the build will be passed after BDD integration is run on QA, then it should be promoted to the staging/pre-prod environment to make sure that all the REST APIs are intact.

Objective

This article will describe current challenges, usage of Cucumber JVM BDD in agile development, setup with Spring Boot, and Jenkins integration. Cucumber has very powerful reporting with graphs and tables, which can be integrated with Jenkins and share the report. It also generates JSON reports, which can be integrated with other applications or integration testing. It simplifies behavioural testing by using a simple English-like language that can be written by business/QA (non-developers) and later converted to a technical integration test case with or without mocking. 

Why BDD?

BDD (Behavior Driven Development) is a methodology for developing software through continuous interaction between developers, QAs, and BAs within the agile team. BDD has these major components:

  • Feature file: It contains feature info like scenarios, steps, and examples (test data). It’s written in Gherkin. It’s a plain text file with the “.feature” extension.
  • Scenario: Every feature can have multiple positive and negative test scenarios — for example, login with the wrong password, login with the correct login credentials, etc.
  • Step Definitions: Every scenario contains a list of steps.

Given-When-Then

BDD is based on these three major pillars:

1. Given: Precondition.

2. When: Test execution.

3. Then: Acceptance and assertions.

Reference: https://github.com/cucumber/cucumber/wiki/Given-When-Then. Cucumber doesn’t technically distinguish between these three kinds of steps.

Given

The purpose of Givens is to put the system in a known state before the user (or external system) starts interacting with the system (in the When steps). Avoid talking about user interaction in Givens. If you were creating use cases, Givens would be your preconditions.

Examples

  1. Setting up initial data
  2. Setting up the initial configuration
  3. Creating model instances

When

The purpose of When steps are to describe the key action the user performs, such as interacting with a web page. It actually calls the business logic or actual APIs.

Then

The purpose of Then steps is to observe outcomes like JUnit assertions. The observations should be related to the business value/benefit in your feature description. The observations should also be on some kind of output (calculated value, report, user interface, message).

Examples

  • Testing REST APIs or test execution.
  • Verifying that something related to the Given+When is (or is not) in the output.
  • Checking that some external system has received the expected message.

And, But

If you have several Givens, Whens, or Thens, you can write like this:

Scenario: Multiple Givens
    Given one thing
    Given another thing
    Given yet another thing
    When I open my eyes
    Then I see something
    Then I don't see something else

Or you can make it read more fluently by writing:

Scenario: Multiple Givens
    Given one thing
      And another thing
      And yet another thing
    When I open my eyes
    Then I see something
      But I don't see something else
  1. Simplicity: No-technical syntax of features files. Features files are written in plain English, which can be linked with Agile stories.
  2. Communication between business and development is extremely focused as a result of a common English-type language.
  3. The code is easier to maintain, flexible, and extendable.
  4. The code is self-documenting with the examples.
  5. Test data can be changed only in the features file, not in the code.
  6. Stories are easier to “groom” – breakdown, task, and plan.
  7. There is more visibility into team progress and status using reports. Cucumber reports can be shared with top level management, integrated with Jenkins and configured with email notifications. It can also be integrated with automated build and deployment tools like Jenkins email plugins.

Unit Testing vs. TDD vs. BDD

Unit testing is for testing individual modules, whereas TDD is based on writing test cases first and then writing code to make that pass. BDD is based on the behavioral testing based on real scenarios (which can’t be tested in TDD). Testing microservices REST APIs are a good example.

Reference: This article has detail comparison matrix with other BDD tools: https://codeutopia.net/blog/2015/03/01/unit-testing -tdd-and-bdd/.

Why BDD with Cucumber? Pros/Cons:

Note: Please refer this comparison reference with other BDD tools/APIs: https://dzone.com/articles/brief-comparison-bdd.

Cucumber is a very powerful framework for BDD testing. It has many useful features like testing by example (data tables, which can be part of the test cases ) or parameters, which can be passed directly from feature file(s). Multiple sets of tests can be sent to BDD test cases. Test data can be passed from the feature files without touching code or making changes in properties resource files. Features files and the related code looks readable and maintainable. Additionally, Cucumber supports many different languages and platforms like Ruby, Java, or .NET.

Getting Started With Cucumber

Cucumber setup with SpringBoot, RestAssured, AssertJ, and JSONAssert.

This sample code is developed using Cucumber with SpringBoot v1.5.1, RestAssured v3.0.3, AssertJ and Java 8.

Prerequisite:

  1. Knowledge of basic Java and SpringBoot framework
  2. BDD fundamentals
  3. Windows/Mac with Java 8 installed
  4. Familiarity of Java based testing framework RestAssured, AssertJ, and JSONAssert

Cucumber Maven Dependencies:

<dependencies>
  <dependency>
<groupId>org.springframework.boot</groupId>
<artifactId>spring-boot-starter-web</artifac
tId>
  </dependency>
  <dependency>
<groupId>org.springframework.boot</groupId>
<artifactId>spring-boot-starter-test</artifa
ctId>
  </dependency>
   <dependency>
<groupId>org.springframework.boot</groupId>
<artifactId>spring-boot-devtools</artifactId>
   <optional>true</optional>
  </dependency>
  <dependency>
   <groupId>info.cukes</groupId>
   <artifactId>cucumber-spring</artifactId>
   <version>${cucumber.version}</version>
  </dependency>
  <dependency>
   <groupId>io.rest-assured</groupId>
   <artifactId>rest-assured</artifactId>
   <version>${restassured.version}</version>
  </dependency>
  <dependency>
   <groupId>info.cukes</groupId>
   <artifactId>cucumber-junit</artifactId>
   <version>${cucumber.version}</version>
   <scope>test</scope>
  </dependency>
  <dependency>
   <groupId>info.cukes</groupId>
   <artifactId>cucumber-java</artifactId>
   <version>${cucumber.version}</version>
   <scope>test</scope>
  </dependency>
  <dependency>
   <groupId>org.springframework</groupId>
   <artifactId>spring-tx</artifactId>
  </dependency>
  <dependency>
<groupId>com.googlecode.json-simple</groupId>
   <artifactId>json-simple</artifactId>
  </dependency>
  <dependency>
   <groupId>com.jayway.jsonpath</groupId>
   <artifactId>json-path-assert</artifactId>
   <scope>test</scope>
   </dependency>
</dependencies>

Feature file:

@signupServices
     Feature: Cucumber -  SignUp Services
     Integration Test
     Scenario Outline: set initial configuration
     for SignUp Services
      Given app API Key header "<api_key>"
      And user id is "<userId>"
      And user password is "<password>"
      When access token service is called
      Then retrun access token
      And response code is 200
      Examples:
       |api_key | userId |
     password | client_id|
       | test************ | password |
     rajivtest5@test.com | test************* | test*********** |

Advanced Reporting Dashboard

Image title

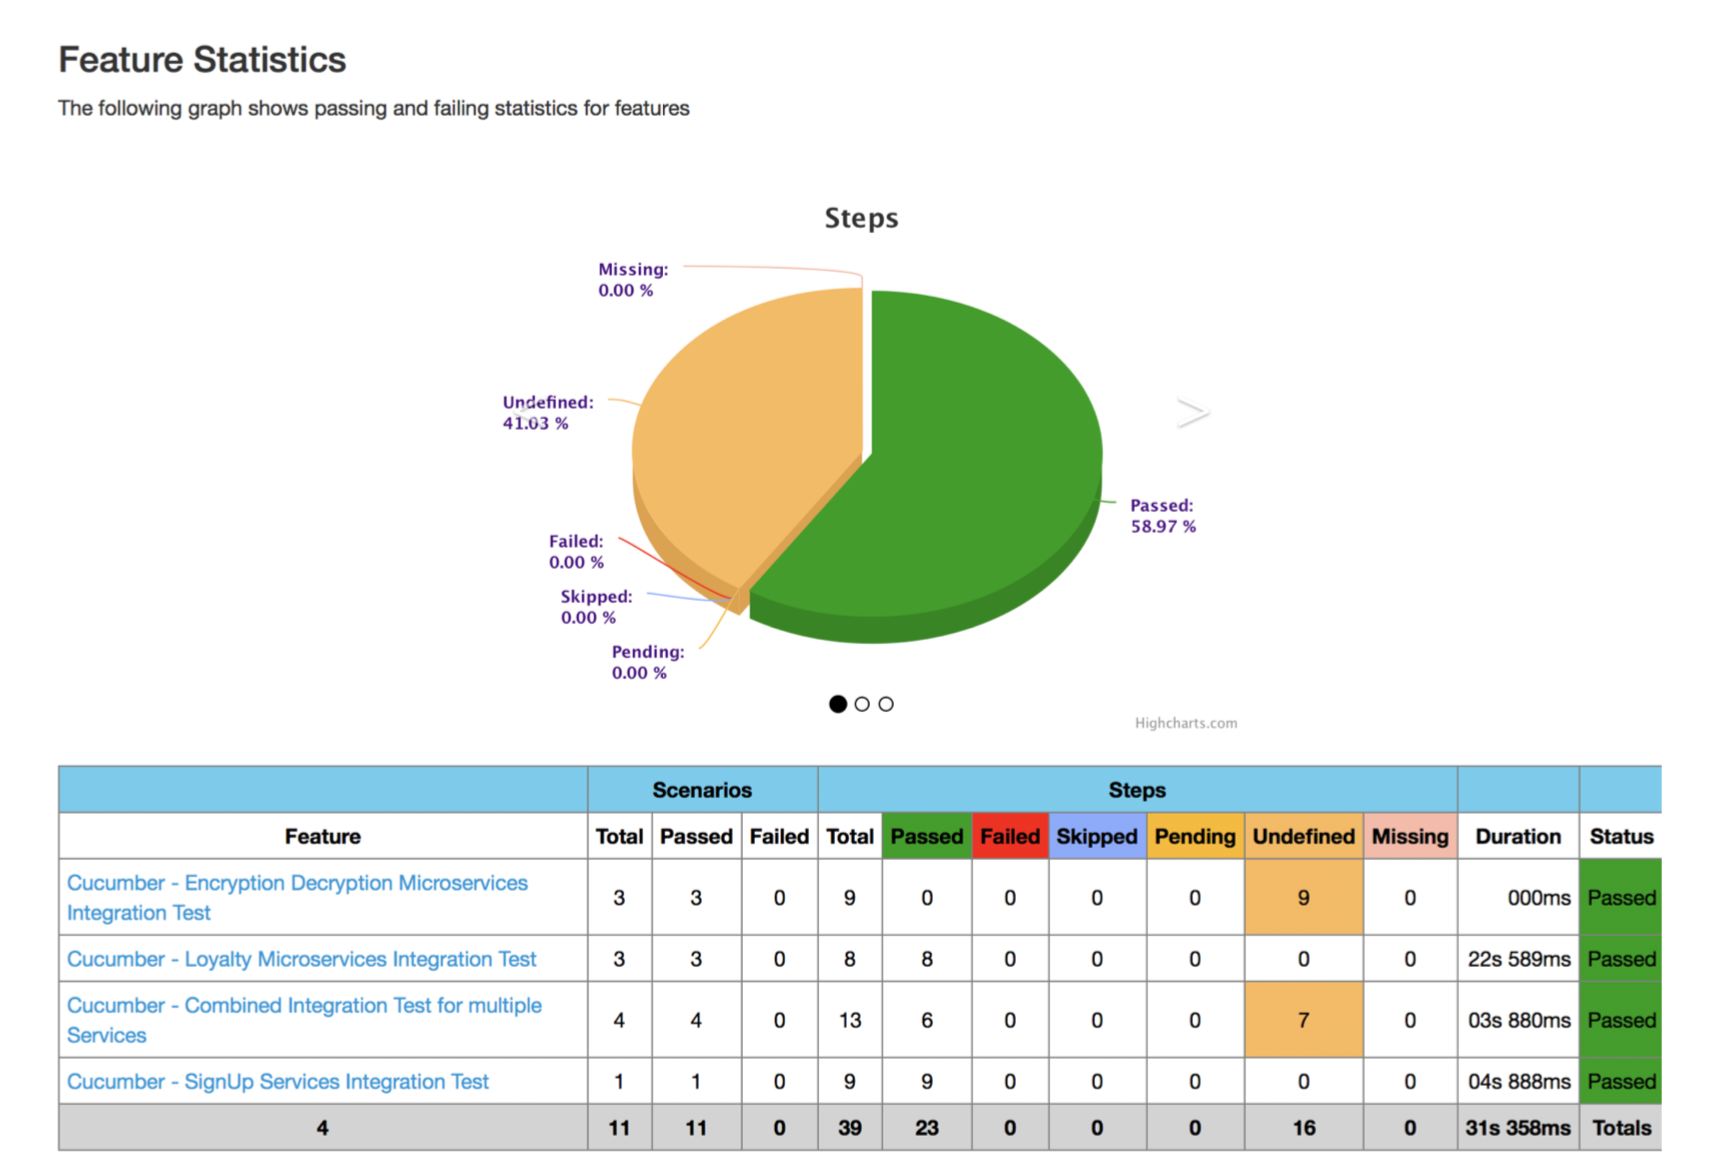
Run Cucumber Test Cases From the Command Line

<plugin>
    <groupId>org.apache.maven.plugins</groupId>
    <artifactId>maven-surefire-plugin</artifactId>
    <configuration>
        <testFailureIgnore>true</testFailureIgnore>
        <includes>
            <exclude>**/*CucumberRunner.java</exclude>
        </includes>
    </configuration>
</plugin>

To run Cucumber from the command line, you need to add this Maven plug-in.

Now, Cucumber integration tests can be run by simply using:

# Run integration test cases
$ mvn verify

Test Suite Using Cucumber

Cucumber has a feature to group features/scenarios as a group, which is called a “tag”. It can be annotated in the feature file by using @, for example, @signupServices. These test suites can be run individually based on your requirements.

# Run a Cucumber test suite
$ mvn clean test -Dcucumber.options="--tags @encryptionServices"
-Dspring.profiles.active=dev
# Run multiple Cucumber test suites
$ mvn clean test -Dcucumber.options="--tags
@signupServices,@loyaltyService" -Dspring.profiles.active=dev
# Run a Cucumber test suites and also generate detail report with
graphs and jar/class files
$ mvn clean install -Dcucumber.options="--tags @loyaltyService"
-Dspring.profiles.active=dev
#Run all test suites and also generate detail report with graphs
and jar/class files
$ mvn clean install

Cucumber Jenkin Integration

Please refer these links to configure and integration with Jenkin.

Note:

The same Maven test plugins seen above will be required to create multiple Jenkins profiles for each feature or group of features by adding tags.

Mocking REST API With WireMock : Recording and Manual Modes

Current Challenges (Use Case)

Disclaimer: This blog content has been taken from my latest book:

“Cloud Native Microservices with Spring and Kubernetes”

I am a cloud architect and an API developer. I have seen these frequent issues in API development during the development phase. Currently, Dev/QA environment is impacted by frequent third-party APIs outages and other service environment issues. It affects Dev/QA teams productivity and happens often, which stops all the development and testing work. There is a need for a mocking API server, which will sync with the main 3rd party servers (service provider) and cache the API response periodically on the mock server for Dev/QA environment. So, when 3rd party REST API services are down then dev and testing work won’t be impacted on Dev/QA servers.

Objective

This tutorial will cover installation and usage of Wiremock for using open source WireMock. The objective of using WireMock is to use as a backup mock server in the failover/outage of the actual REST APIs.

Why WireMock?

  1. According to the official document of wiremock.org, WireMock is a simulator for HTTP-based APIs. Some might consider it a service virtualization tool or a mock server. It enables you to stay productive when an API you depend on doesn’t exist or isn’t complete for using (still in dev phase). It supports testing of edge cases and failure modes that the real API won’t reliably produce. And because it’s fast it can reduce your build and test time from hours down to minutes.
  2. Record and Playback — It can run on recording mode. Get up and running quickly by capturing outside third party traffic to and from an existing API. It caches REST API response to WireMock proxy server.
  3. Real API’s request and response can be cached locally and can be used as a mock server in the absence of the real server using recording feature.
  4. It provides a provision to create the requests and corresponding responses in form of JSON objects.
How WireMock works?

Scope

  1. WireMock will be used as a mocking server.
    • The scope of this mocking server is to run it as an independent server or at the developer machine for REST API mocking. Also, it should be deployed on the remote non-prod and prod servers for QA testing.
  2. It will sync up real third party servers and record all the tested API requests and responses.
  3. Additionally, mock JSON files can be created for the custom scenarios for the different set of the request.
  4. The Same JSON will be used by web clients internally for local testing during the development phase.

Note: One WireMock instance (JVM) can be only configured for single API server.

Mocking Existing Active APIs (Through WireMock Recording and Playback for New API)

It caches all the API responses when it hits API the first time, and the next time, WireMock will pick up the response from the local cache where WireMock is deployed and returned to the client. To flush off the WireMock cache and get it updated, you need to run “/reset” admin API to refresh the API mapping cache.

Mocking New API When API is Not Available.

Test for the different set of test data, URI parameters like query and path parameters. The Wiremock cache by its unique UUID key will be different for the different request data/query.

Wiremock Can Be Run in These Two Modes:


1. Auto-Switching Mode: Seamless development and testing by pointing to WireMock server when the main server is up/down with its continuous recording mode feature. In this mode, the client will always point to WireMock server only, and WireMock server mock all the responses. In this case, the client doesn’t have to change URL of the server in their build. In this mode, the recording will be always ON. Only, need to run “/reset” admin API to refresh API mapping cache.

2. Manual Switching Mode: Client has to change URL of the server in their build when the main server is down and switching is required to WireMock server. In this mode, the recording will be always on.

Assumptions and Limitations

Only one environment can be configured and mocked with one instance of WireMock i.e. the configured IP address while starting WireMock will be mocked through that instance. Example: for starting the WireMock, we will run below command so only API hitting to http://thirdpartyservices.com will be mocked. So, if the client is connecting to more than one server, then multiple WireMock instances have to run on the different ports and each WireMock will point to one proxy server.

 $ –java -jar wiremock-standalone-2.7.1.jar --port 9000 --proxy-all=" http:///thirdpartyservices.com" --record-mappings

Once the user has switched to using cached/stored files of WireMock server using “/reset” API, then the user cannot switch back to original API unless WireMock server is re-started and saved JSON in the WireMock server is deleted.

In the recording mode client will get only previously cached response when the main server is down; WireMock automatically connects with the main server when it’s up and running.

Usage

Setup WireMock

Run WireMock as “Standalone mode” or “deployed into a servlet container.” In this article, we will see running WireMock as standalone mode. To setup, WireMock follows the below steps. Download the WireMock from this URL:

Installation

=> downloaded the standalone JAR from here.

After running WireMock first time, it will create these two folders in the same home directory where WireMock jar has existed:

1. mappings => It contains request and response JSON.

2. _files => It contains response errors and messages JSON. Also, it contains HTML response as text files.

Note: Every request will create separate mapping JSON file in WireMock home directories with the different file names and unique IDs. So, the same API can be called with the different requests.

It stores request/response JSON like this:

<!-- wp:table -->
<figure class="wp-block-table"><table><tbody><tr><td>{ "id" : "d03988e07a55", "request" : { "url" : "product/id/11111111", "method" : "GET" }, "response" : { "status" : 200, "bodyFileName" : "body-id-11111111.json", "headers" : { "Date" : "Sat, 10 Jun 2018 19:53:44 GMT", "X-Powered-By" : "Servlet/3.0", "correlation-id" : "1497124424607", "Access-Control-Allow-Origin" : "*", "channel" : "ANDROID", "Keep-Alive" : "timeout=10, max=100", "Connection" : "Keep-Alive", "Transfer-Encoding" : "chunked", "Content-Type" : "application/json;charset=UTF-8" } }, "uuid" : "d03988e07a55" }</td></tr></tbody></table></figure>
<!-- /wp:table -->

How Developers Can Utilize WireMock

  1. Developers can install locally on his/her machine and record all the REST APIs when API is available. The response can be modified manually or created manually and placed in the same mapping folder. Now, the client can point to the WireMock server instead of the real server when the real server is down.
  2. Client apps (Native/Web) can also place these auto-generated JSON request/response APIs in their local code and point to the same while development.
  3. The developer can also run a set of test script using JMeter/JUnit test suites and record/mock all the REST APIs request/responses.
  4. How QA Can Utilize WireMock (Sync REST services at Remote Server):A backup remote server is required to sync mock responses of the real server during testing. It should be set up with the help of DevOps team which will be available when the main server is not available. Either DevOps team can point to the mock server and inform all related dev/QA teams by email or it should be automatically switched by checking the REST API server health continuously.

Case 1: Recording and Playback for an Existing API

  1. Assuming WireMock server is running on a host machine on some port, hit the URL of the API from Postman whose response is to be recorded. To record API response, change the actual hostname to WireMock host and port. The response of API is captured as JSON or requested data type on WireMock.
  • GET — Method name of the API
  • localhost — host machine address where WireMock is deployed
  • 9000 — port number
  • API URI (v1/product) — API URL whose response is to be recorded

2. Now, when you hit again, still the response will come from the actual host. To get the recorded response from WireMock, hit POST “/RESET” admin API request on Postman.

__admin/mappings/reset — request to hit to refresh and switch to WireMock cache.

Example:

Note:

  1. As WireMock is running in the recording mode, whenever you hit an API, it records its response. Unless you use RESET, you will keep on getting the response from actual API. RESET is to be used when we want to start getting the response from WireMock server from recorded JSON files.So we can hit RESET request once we have done the recording for all the required APIs.
  2. If we hit some API which we are hitting for the first time (i.e. its response is not yet recorded) then its response will be saved in WireMock. Once recorded, RESET WireMock and get a recorded response.

Case 2: Recording and Playback for the Same API With Different Request Data

  1. For any API having different request data (parameters, headers, request body data) different mapping files and response JSON will be created on the WireMock cache. For these two same APIs with different request data like query parameter will have two mappings and two JSON responses.

Example:

localhost:9000/ v1/products?sku=9956

localhost:9000/ v1/products?sku=9777

2. Run “/RESET” API to switch to the WireMock cached response.

Case 3: Mocking New API (Which Is Not Available or Ready at the API Server)

There are two methods to create your own custom mapping for mocking an API’s response using WireMock.

Scenario: Create mapping for an API having these expected responses-

URI — some/thing

Method — POST

API request body data — { “numbers”: [1, 2, 3,10] }

API response — { “id”: “1”, “name”: “xyz” }

Status: 200

Headers — Content-Type: “application/json”

Method-1: Upload Your Own Custom JSONFfile

  1. Create a JSON file like <<fileName>>.json. It should be a valid JSON file.
  2. Place this JSON payload file in “_files” folder (all API responses are saved here) of WireMock. (Note: DevOps team will help on this)
  3. Select JSON (application/JSON) as content type from the drop-down in Postman and hit create mappings request with request body as shown below. Add this file name for the JSON key “bodyFileName”. e.g: “bodyFileName”= “test.json.” Example: POST: localhost:9000/__admin/mappings

API Definition:

Request Body ParametersExplanationExample
requestContains request data of API to be mocked
methodHTTP method of API to be mockedGET, POST, PUT, DELETE
urlURL of the APIsome/thing
bodyPatternsDefine request body data of the API
equalToJsonContains JSON data to be passed in the request body of API“equalToJson”: “{ \”numbers\”: [1, 2, 3,10] }”
responseContains response data of API to be mocked
statusHttp status code of the API2xx or 4xx
bodyFileNameContains file name for the JSON responsetest.json
headersSpecify headers present in the response and/or request“Content-Type”: “application/json


4. Now hit “/save” mappings request on Postman.

POST: localhost:9000/__admin/mappings/save

Important Note: If we do not save mappings, then the next time WireMock server gets started, our created response will be lost. No mapping gets saved without this on WireMock.

5. Now to check the response of this created mocked API, hit the API from Postman using its parameters, request body data whatever is needed. Now, API response will come from WireMock.

  • POST — method to be called on API some/thing
  • localhost — host machine address where WireMock is deployed
  • 9000 — port number
  • some/thing — API URL whose response is to be checked
  • request body — { “numbers”: [1, 2, 3,10] }
  • headers — Content-Type:application/JSON

Method-2: Upload your JSON Object (No help is required from DevOps)

  1. Select JSON from the drop-down in postman and hit create mappings request on Postman with request body as shown below.

ExamplePOST: localhost:9000/__admin/mappings

2. For adding our JSON object instead of JSON file use “jsonBody” instead of “bodyFileName”.

Request Body ParametersExplanationExample
jsonBodypass JSON object required as API response“jsonBody”: {“id”: “1”,”name”: “xyz”}


3. Save and test created API mapping and hit the “/save” API.

Case 4: Need Updated Data From the API Server

  1. DevOps needs to stop the WireMock server.
  2. DevOps needs to delete following folders in WireMock server
    1. __files
    2. mappings
  3. Restart the WireMock server. The user can start using the WireMock with above-mentioned cases.

DevOps Responsibilities:

  • Restart the server in recording mode

Command to run on cmd (from the directory where WireMock jar is located):

java -jar wiremock-standalone-2.7.1.jar –port <<port-number>> -proxy-all=<<host-name>> –record-mappings

$ java -jar wiremock-standalone-2.7.1.jar --port 9000 -proxy-all="http://test.com" --record-mappings
  • Upload JSON file to WireMock server’s “_files” folder ( if required to upload response JSON file).
  • Clean up the server: DevOps team has to clean up the server by removing these two folders on demand like weekly or monthly.
    1. __files
    2. mappings

References: