I have recently worked and tried out a wonderful continuous delivery (CD) tool ArgoCD. It’s an awesome deployment tool, specially designed to deploy microservices workloads on Kubernetes. It’s a declarative GitOps continuous delivery tool for Kubernetes. It’s has awesome web UI dashboard to monitor and manage deployment. It’s directly linked with source code repo like GitHub.
Objective:
Why ArgoCD?
Prerequisite
How to install ArgoCD on Kubernetes cluster
How to use ArgoCD using UI and CLI headless modes
Create a deployment app in ArgoCD with a sample GitHub Repo and sync
Other Kubernetes Operations from UI:
Why ArgoCD?
It works on pull mechanism.Application definitions, configurations, and environments should be declarative and version controlled. Application deployment and lifecycle management should be automated, auditable, and easy to understand.
I like the this awesome feature of auto-syncing and deployment on K8s cluster for making any small change in K8s deployment manifest source code.
Prerequisite
Kubernetes cluster should be installed and logged in. You can use KIND (Kubernetes Inside Docker) or MiniKube for local testing. I have used TKG Kubernetes cluster.
$ kubectl port-forward svc/argocd-server -n argocd 9080:443

Forwarding from 127.0.0.1:9080 -> 8080
Forwarding from [::1]:9080 -> 8080
Create a deployment app in ArgoCD with a sample GitHub Repo and sync
You are now almost ready to deploy your application.However, first you need to tell ArgoCD about your deployment target. By default, if you do not add an additional Kubernetes cluster target, ArgoCD will deploy applications to the cluster on which it is installed. To add your target Kubernetes cluster to ArgoCD, use the following:
$ argocd cluster add target-k8s
This will add an ArgoCD service account onto the cluster, which will allow ArgoCD to deploy applications to it
Create an App in ArgoCD with a sample GitHub Repo
There are two ways to create app in ArgoCD:
There are two ways to use ArgoCD:
UI mode
CLI mode (headless)
1. UI mode
Login to ArgoCD:
https://localhost:9080/

# User Id - admin,
# Password - Can be retrieved from this command:

$ kubectl get pods -n argocd -l app.kubernetes.io/name=argocd-server -o name | cut -d'/' -f 2
Create APP – using ArgoCD UI
Give a project name
Select default cluster
Select your Kubernetes cluster namespace
You need url of source code repo. I am using Github repo.
Select “Target Revision” of source code. I have used “HEAD”
Add “Path” from Kubernetes deployment manifest files location
Note: You can also click on “Sync” button on ArgoCD UI.
Now, simply forward the port as you did for the ArgoCD UI.
Once this completes, you can see the status and configuration of your app by running the following:
$ argocd app list
For a more detailed view of your application configuration, run:
$ argocd app get online-store-k8s-demo
Initially your app will be Out of Sync and no health status. Now you are ready to sync your application to your target cluster. To do this, simply use the sync command for your application:
In this blog, I will cover up, how to create OCI docker image from Windows ASP .Net application to .Net Core container using open source “Pack” API and deploy on Kubernetes cluster using open source Contour ingress controller. Also, will set up MetaLB load balancer of Kubernetes cluster.
Objective:
Build .Net Core OCI docker image of ASP .Net application using Pack buildpack API
Run this docker image on docker for quick docker verification
Push docker image to image registry Harbor
Install and configure Contour ingress controller
MetalLB load balancer for Kubernetes LoadBalancer service to expose as an external IP to public
Create a deployment and Service script to deploy docker image
Create an ingress resource and expose this .Dot app to external IP using Contour ingress controller
Prerequisite:
Kubernetes cluster setup. Note: I have used VMware’s Tanzu Kubernetes Grid (TKG)
Kubectl CLI
Pack buildpack API
Image registry Harbor setup
git CLI to download Github source code
MacOS/Ubuntu Linux or any shell
1. Build OCI docker image of ASP .Net application using Pack buildpack API:
Install and configure “Pack” API. I have installed on Ubuntu Linux:
wget https://github.com/buildpacks/pack/releases/download/v0.11.2/pack-v0.11.2-linux.tgz
tar xvf pack-v0.11.2-linux.tgz
mv pack /usr/local/bin
# Browse all suggested builders

$ pack suggest-builders
Suggested builders:
	Google:                gcr.io/buildpacks/builder                    Ubuntu 18 base image with buildpacks for .NET, Go, Java, Node.js, and Python
	Heroku:                heroku/buildpacks:18                         heroku-18 base image with buildpacks for Ruby, Java, Node.js, Python, Golang, & PHP
	Paketo Buildpacks:     gcr.io/paketo-buildpacks/builder:base        Ubuntu bionic base image with buildpacks for Java, NodeJS and Golang
	Paketo Buildpacks:     gcr.io/paketo-buildpacks/builder:full-cf     cflinuxfs3 base image with buildpacks for Java, .NET, NodeJS, Golang, PHP, HTTPD and NGINX
	Paketo Buildpacks:     gcr.io/paketo-buildpacks/builder:tiny        Tiny base image (bionic build image, distroless run image) with buildpacks for Golang

Tip: Learn more about a specific builder with:
	pack inspect-builder <builder-image>

# Set this full-cf .Net builder which has support for most of the languages (Java, .NET, NodeJS, Golang, PHP, HTTPD and NGINX).Syntax: pack set-default-builder <builder-image>
$ pack set-default-builder gcr.io/paketo-buildpacks/builder:full-cf

# Clone the GitHub project
$ git clone https://github.com/rajivmca2004/paketo-samples-demo.git and && cd paketo-samples-demo/dotnet-core/aspnet

# Building docker image and convert into .Net core container
$ pack build dotnet-aspnet-sample
2. Run this docker image on docker for quick docker verification
# Running docker image for quick verification before deploying to K8s cluster
$ docker run --interactive --tty --env PORT=8080 --publish 8080:8080 dotnet-aspnet-sample

# Viewing
$ curl http://localhost:8080
We need an ingress controller to expose Kubernetes services as external IP. It will work as an internal load balancer to expose to K8s services on http/https and REST APIs of microservices.
4. Install and configure Contour ingress controller
Refer this installation doc of Contour open source for more information
# Run this command to download and install Contour open source project

$ kubectl apply -f https://projectcontour.io/quickstart/contour.yaml
5. MetalLB load balancer for Kubernetes LoadBalancer service to expose as an external IP to public
Kubernetes does not offer an implementation of network load-balancers (Services of type LoadBalancer) for bare metal clusters. The implementations of Network LB that Kubernetes does ship with are all glue code that calls out to various IaaS platforms (vSphere, TKG, GCP, AWS, Azure, OpenStack etc). If you’re not running on a supported IaaS platform, LoadBalancers will remain in the “pending” state indefinitely when created.
Bare metal cluster operators are left with two lesser tools to bring user traffic into their clusters, “NodePort” and “externalIPs” services. Both of these options have significant downsides for production use, which makes bare metal clusters second class citizens in the Kubernetes ecosystem.
Please follow this MetalLB installation doc for the latest version. Check that MetalLB is running.
$ kubectl get pods -n metallb-system
Create layer 2 configuration:
Create a metallb-configmap.yaml file and modify your IP range accordingly.
Recently,I have done a POC for a client with the latest TKG v1.1.2 ( Latest updated: July’20) and faced a couple of challenges on air- gapped environment. Installing and configuring TKG management and worker clusters on air-gapped(No Internet/offline) environment is nightmare. You need to plan properly and download all required docker images of TKG and related technology stacks and libraries on your private image registry first. I have used Harbor open source image registry in this blog.
This blog is not replacement of official doc. It’s quick references to join all the dots, tips like how to manually download, tag, push and change K8s manifest files images, prerequisite and other quick references to save time and have everything on a single pager.
I have followed this deploying TKG instructions on an air-gapped environment (Deploy Tanzu Kubernetes Grid to vSphere in an Air-Gapped Environment), there are some more steps required to complete successful installation. This blog will cover TKG v1.1.2 on vSphere 6.7 in air gapped environment.
Note: I have used latest Ubuntu v20.04 LTS on bootstrap VM which will have Internet connectivity. You can sue CentOS are any other Linux flavour.
Note: I have used latest Ubuntu v20.04 LTS on bootstrap VM which will have Internet connectivity. You can use CentOS are any other Linux flavour.
I have used TKG dev plan:
Prerequisite for Bootstrap Env – Ubuntu/CentOS Linux
Mandatory : Ubuntu- docker.io is available from the Ubuntu repositories (as of Xenial). # Install Docker sudo apt install docker.io sudo apt install docker-compose
Crash Recovery and Diagnostics for Kubernetes 0.2.2 Linux
Step-1: Setup all prerequisite, install Ubuntu OS on bootstrap VM
Step:2 Download all binaries with your VMware credentials and push/copy all compressed tar files to bootstrap VM machine.
Step:3 Make sure Internet is available on the bootstrap VM from where you need to initiate installation of TKG and other binaries.
Step:4 Install Docker Desktop and CLI. Make sure that the internet-connected machine has Docker installed and running.
Step:5Install Harbor and create certificate using OpenSSL and https config. Also, add harbor certificates in docker config file in .harbor/harbor.yml
# https related config
https:
  # https port for harbor, default is 443
  port: 443
  # The path of cert and key files for nginx
  certificate: /root/harbor/data/cert/harbor.vmwaredc.com.crt
  private_key: /root/harbor/data/cert/harbor.vmwaredc.com.key
#edit /etc/hosts and add namespace entry of DNS server
10.109.19.13 harbor.vmwaredc.com

$ systemd-resolve --status
UI: https://harbor.vmwaredc.com Verify: Make sure that you can connect to the private registry from the internet-connected machine.
Step:7 Install tkg CLI on same bootstrap VM with external internet connection, and follow the instructions in Download and Install the Tanzu Kubernetes Grid CLI to download, unpack, and install the Tanzu Kubernetes Grid CLI binary on your internet-connected system.
Step:8 Follow all the steps as mentioned in the installation doc. Open vSphere UI console and provide all vCenter v6.7 server details, vLAN, resource configuration etc. It will create configuration file config.yaml in .tkg folder which will have all main TKG installation configuration.
Note: vCenter server should be an IP or FQDN in only small letters.
Step:9 Upload TKG and HAProxy OVA to vSphere UI console.
Step:10 Add this export before initiating TKG installation –
On the bootstrap machine with an internet connection on which you have performed the initial setup tasks and installed the Tanzu Kubernetes Grid CLI, install yq 2.x. NOTE: You must use yq version 2.x. Version 3.x does not work with this script.
Run the $ tkg get management-cluster command.
Running a tkg command for the first time installs the necessary Tanzu Kubernetes
Grid configuration files in the ~/.tkg folder on your system. The script that you create and run in subsequent steps requires the files in the ~/.tkg/bom folder to be present on your machine. Note: TKG v1.1.2 picks bom/bom-1.1.2+vmware.1.yamlimage file.
Set the IP address or FQDN of your local registry as an environment variable.In the following command example, replace custom-image-repository.io with the address of your private Docker registry.
Copy and paste the following script in a text editor, and save it as gen-publish-images.sh
#!/usr/bin/env bash
# Copyright 2020 The TKG Contributors.
#
# Licensed under the Apache License, Version 2.0 (the "License");
# you may not use this file except in compliance with the License.
# You may obtain a copy of the License at
#
#     http://www.apache.org/licenses/LICENSE-2.0
#
# Unless required by applicable law or agreed to in writing, software
# distributed under the License is distributed on an "AS IS" BASIS,
# WITHOUT WARRANTIES OR CONDITIONS OF ANY KIND, either express or implied.
# See the License for the specific language governing permissions and
# limitations under the License.
BOM_DIR=${HOME}/.tkg/bom
if [ -z "$TKG_CUSTOM_IMAGE_REPOSITORY" ]; then
    echo "TKG_CUSTOM_IMAGE_REPOSITORY variable is not defined"
    exit 1
fi
for TKG_BOM_FILE in "$BOM_DIR"/*.yaml; do
    # Get actual image repository from BoM file
    actualImageRepository=$(yq .imageConfig.imageRepository "$TKG_BOM_FILE" | tr -d '"')
    # Iterate through BoM file to create the complete Image name
    # and then pull, retag and push image to custom registry
    yq .images "$TKG_BOM_FILE" | jq -c '.[]' | while read -r i; do
        # Get imagePath and imageTag
        imagePath=$(jq .imagePath <<<"$i" | tr -d '"')
        imageTag=$(jq .tag <<<"$i" | tr -d '"')
        # create complete image names
        actualImage=$actualImageRepository/$imagePath:$imageTag
        customImage=$TKG_CUSTOM_IMAGE_REPOSITORY/$imagePath:$imageTag
        echo "docker pull $actualImage"
        echo "docker tag $actualImage $customImage"
        echo "docker push $customImage"
        echo ""
    done
done
Make the script executable .chmod +x gen-publish-images.sh
Generate a new version of the script that is populated with the address of your private Docker registry ../gen-publish-images.sh > publish-images.sh
Verify that the generated version of the script contains the correct registry address cat publish-images.sh
Make the script executable .chmod +x publish-images.sh
Log in to your local private registry. docker login ${TKG_CUSTOM_IMAGE_REPOSITORY}
Run the script to pull the required images from the public Tanzu Kubernetes Grid registry, retag them, and push them to your private registry ../publish-images.sh
When the script finishes, turn off your internet connection. (Optional) After that Internet is not required for TKG.
Modify TKG dev installation plan. Run these following commands on the home directory one level up (outside of .tkg folder location) :
$ export REGISTRY="harbor.vmwaredc.com"
$ export NAMESERVER="10.109.19.5"
$ export DOMAIN="vmwaredc.com"
$ cat > /tmp/harbor.sh <<EOF
echo "nameserver $NAMESERVER" > /usr/lib/systemd/resolv.conf
echo "domain $DOMAIN" >> /usr/lib/systemd/resolv.conf
rm /etc/resolv.conf
ln -s /usr/lib/systemd/resolv.conf /etc/resolv.conf
mkdir -p /etc/containerd
echo "" > /etc/containerd/config.toml
sed -i '1 i\# Use config version 2 to enable new configuration fields.' /etc/containerd/config.toml
sed -i '2 i\# Config file is parsed as version 1 by default.' /etc/containerd/config.toml
sed -i '3 i\version = 2' /etc/containerd/config.toml
sed -i '4 i\ ' /etc/containerd/config.toml
sed -i '5 i\[plugins]' /etc/containerd/config.toml
sed -i '6 i\  [plugins."io.containerd.grpc.v1.cri"]' /etc/containerd/config.toml
sed -i '7 i\    sandbox_image = "registry.tkg.vmware.run/pause:3.2"' /etc/containerd/config.toml
sed -i '8 i\    [plugins."io.containerd.grpc.v1.cri".registry]' /etc/containerd/config.toml
sed -i '9 i\      [plugins."io.containerd.grpc.v1.cri".registry.mirrors]' /etc/containerd/config.toml
sed -i '10 i\        [plugins."io.containerd.grpc.v1.cri".registry.mirrors."$REGISTRY"]' /etc/containerd/config.toml
sed -i '11 i\          endpoint = ["https://$REGISTRY"]' /etc/containerd/config.toml
sed -i '12 i\      [plugins."io.containerd.grpc.v1.cri".registry.configs]' /etc/containerd/config.toml
sed -i '13 i\        [plugins."io.containerd.grpc.v1.cri".registry.configs."$REGISTRY"]' /etc/containerd/config.toml
sed -i '14 i\          [plugins."io.containerd.grpc.v1.cri".registry.configs."$REGISTRY".tls]' /etc/containerd/config.toml
sed -i '15 i\            insecure_skip_verify = true' /etc/containerd/config.toml
systemctl restart containerd
EOF

$ awk '{print "    -", $0}' /tmp/harbor.sh > /tmp/harbor1.yaml
$ awk '{print "      -", $0}' /tmp/harbor.sh > /tmp/harbor2.yaml
$ sed -i '197 e cat /tmp/harbor1.yaml\n' ~/.tkg/providers/infrastructure-vsphere/v0.6.5/cluster-template-dev.yaml
$ sed -i '249 e cat /tmp/harbor2.yaml\n' ~/.tkg/providers/infrastructure-vsphere/v0.6.5/cluster-template-dev.yaml

$ rm /tmp/harbor1.yaml /tmp/harbor2.yaml /tmp/harbor.sh
Step:12 Run this on terminal to initiate installation process, it will create .tkg folder and required config file. In v1.1.2 .bom folder has all image repositiories
$ sudo tkg init --ui -v 6
Step:13 As soon as kind container is up . Run this exec steps into KIND cluster and ran below script.
echo '# explicitly use v2 config format
version = 2
# set default runtime handler to v2, which has a per-pod shim
[plugins]
  [plugins."io.containerd.grpc.v1.cri"]
    sandbox_image = "registry.tkg.vmware.run/pause:3.2"
    [plugins."io.containerd.grpc.v1.cri".containerd]
      default_runtime_name = "runc"
      [plugins."io.containerd.grpc.v1.cri".containerd.runtimes.runc]
        runtime_type = "io.containerd.runc.v2"
    [plugins."io.containerd.grpc.v1.cri".registry]
      [plugins."io.containerd.grpc.v1.cri".registry.mirrors]
        [plugins."io.containerd.grpc.v1.cri".registry.mirrors."harbor.vmwaredc.com"]
          endpoint = ["https://harbor.vmwaredc.com"]
      [plugins."io.containerd.grpc.v1.cri".registry.configs]
        [plugins."io.containerd.grpc.v1.cri".registry.configs."harbor.vmwaredc.com"]
          [plugins."io.containerd.grpc.v1.cri".registry.configs."harbor.vmwaredc.com".tls]
            insecure_skip_verify = true' > /etc/containerd/config.toml
Step:14 At this step, management cluster is created. Now, you can create work load clusters as per installation instructions.
Step:15 To visualize, monitor and inspect TKG Kubernetes clusters. Install Octant UI dashboard. Octant should immediately launch your default web browser on http://127.0.0.1:7777/#/cluster-overview
$ octant
Note: Or to run it on a specific host and fixed port:
OCTANT_LISTENER_ADDR=0.0.0.0:8900 octant
Important Trick:
Pull and push docker images in Air gapped environment
Now, your K8s cluster is ready, next you would like to install K8s deployment or any other K8s images which pulls dependent images from public Internet. Your Kubernetes cluster running on air-gapped environment can’t download any image from public repository (dockerhub, docker.io, gcr etc).
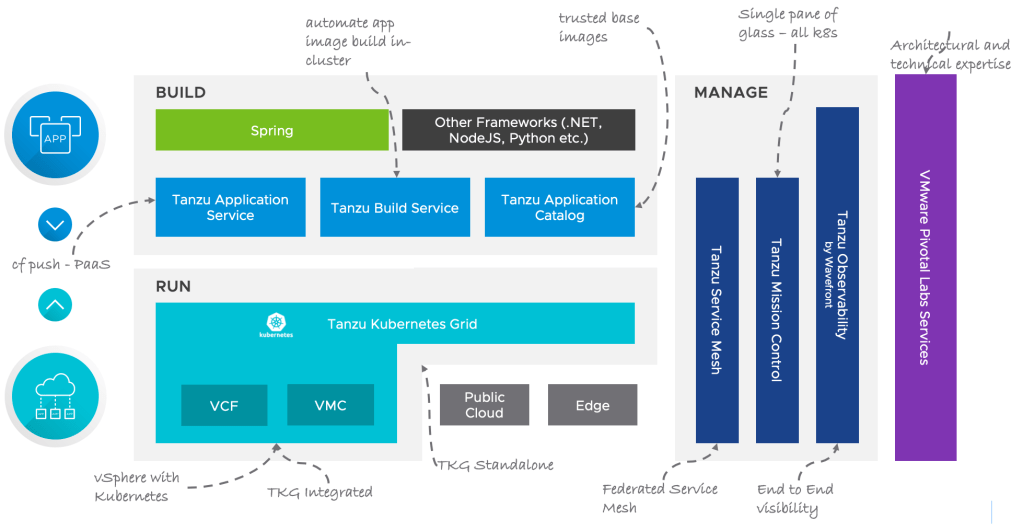
This blog will cover all important and quick useful references of the VMware Tanzu offerings. It’s a cheat sheet and single pager info for all the Tanzu enterprise product offerings, technical docs, demo videos, and white papers. Hope this one-pager info will be handy for developers, architects, business owners, operators, and organizations:
Main Tanzu Page for detail on-boarding of all products, technical details, installation, usage etc. in “Product” menu – https://tanzu.vmware.com/tanzu
This is VMWare’s enterprise-ready upstream Kubernetes distribution and will be available in different form factors based on end-user/customer requirements.
TKG provides enterprises with consistent, upstream aligned, automated multi-cluster operations across SDDC, Public Cloud, and Edge environments that are ready for end-user workloads and ecosystem integrations. TKG does for Kubernetes what Kubernetes does for your containers.
* vSphere7 with native TKG: As embedded in vSphere 7.0 – Fully managed K8s experience on top of vSphere. The solution unlocks on-prem vSphere deployments to run Kubernetes natively. New features in NSX, Center, and ESXi elevates VMs, K8s pods, and K8s clusters to first-class citizens in vSphere, enabling vSphere admins to manage and delegate these new computing constructs seamlessly to DevOps teams. This solution also provides all the benefits of the underpinning TKG technology.
* TKG+ – Build your own K8s platform with VMWare support with ClusterAPI and KubeADM support. It provides true open-source K8s experience with support for a few open-source tools (Harbor registry, Contour, Sonobuoy, Dex, EFK,, Velero, Prometheus, Grafana, etc.)
* TKGI (Tanzu Kubernetes Grid Integrated)– Fully Managed K8s as a Service on any private/public Cloud. The great opinionated choice for day 2 operation, because its operation is fully automated.
* TKG as a service on TMC: TKG managed services on TMC (Tanzu Mission Control)
VMware Tanzu Application Platform is a modular, application detecting platform that provides a rich set of developer tools and a paved path to production to build and deploy software quickly and securely on any compliant public cloud or on-premises Kubernetes cluster. Tanzu Application Platform delivers a superior developer experience for enterprises building and deploying cloud-native applications on Kubernetes. It enables application teams to get to production faster by automating source-to-production pipelines. It clearly defines the roles of developers and operators so they can work collaboratively and integrate their efforts. Tanzu Application Platform includes elements that enable developers to quickly begin building and testing applications regardless of their familiarity with Kubernetes. Operations teams can create application scaffolding templates with built-in security and compliance guardrails, making those considerations mostly invisible to developers. Starting with the templates, developers turn source code into a container and get a URL to test their app in minutes. After the container is built, it updates every time there’s a new code commit or dependency patch. And connecting to other applications and data, regardless of how they’re built or what kind of infrastructure they run on, has never been easier, thanks to an internal API management portal.
This is VMWare’s enterprise-ready upstream Kubernetes distribution with the BOSH director. TKGI provides the ability for organizations to rapidly deploy fleets of Kubernetes clusters in a secure and consistent manner across clouds with minimal effort. It also simplifies the ability to rapidly repave and patch your fleets of Kubernetes clusters. It provides teams access to both Linux and Windows containers
It’s a standalone product offering under Tanzu to cover Production and Development support for OpenJDK, 40+ Spring projects (including the ones used in IDP), and Tomcat.
Get support and signed binaries for OpenJDK, Tomcat, and Spring. Globe spanning support is available 24*7 and your organization gets access to the product team and knowledge base. Avoid maintaining expensive custom code. Get VMware’s TC Server, a hardened, curated, and enterprise-ready Tomcat installation.
Tanzu Application Services/ Cloud Foundry (VM -Diego Container) TAS- VM
Fully automated PAAS (Platform As a Service platform) to increase productivity by automating all cloud-related configuration and deployment on the cloud by just a single command and only source code of the application. It’s based on Diego’s container.
TAS fully automates the deployment and management of applications on any cloud. This makes your operations team more efficient, improves developer productivity, and enhances your security posture. This enables your organization to achieve the business outcomes they desire by reducing time to market.
TBS is a tool to build OCI container images and manage the container life cycle irrespective of the deployment platform. Based on the CNCF project Buildpacks.io TBS takes care of the pain of maintaining docker files and brings standardization to your docker image build process.
TBS customers will close vulnerabilities orders of magnitude faster, they will have developers who spend nearly no time on image builds, and they will be able to easily and programmatically audit production containers. TBS eliminates 95% of the toil of the container lifecycle and allows platform teams to offer automated “code to cloud” style functionality to their developers.
TAC is a curated collection of production-ready popular open-source software that can be used by IDP users. Software support is still based on what’s available with the open-source version, but VMWare provides the ‘proof of provenance’ as well as enterprise-grade testing on these images. Also, it allows customers to bring their own Golden Image while Bitnami(VMWare) is making this image for your developers.
Working with pre-packaged software poses risks and challenges. Developers are sourcing containers from Docker Hub that are out of date, vulnerable, insecure by default, or broken. Auditing, hardening, integrating, and making software ready for production is time-consuming, difficult, and low value add from an organizational standpoint. It’s also frustrating to dev teams as software selection will be limited and lag behind open source options.
Tanzu Service Mesh not only simplifies lifecycle management of service mesh over fleets of K8s clusters, it provides unified management, global policies, and seamless connectivity across complex, multi-cluster mesh topologies managed by disparate teams. It provides app-level observability across services deployed to different clusters, complementing/integrating into modern observability tools you use or are considering.
VMware Tanzu Mission Control provides a single control point for teams to more easily manage Kubernetes and operate modern, containerized applications across multiple clouds and clusters. It codifies the know-how of operating Kubernetes including deploying and upgrading clusters, setting policies and configurations, understanding the health of clusters and the root cause of underlying issues.
The VMware Tanzu Observability by Wavefront platform is purpose built to handle requirements of modern applications and multi-cloud at high scale. It’s a unified solution with analytics (including AI) that ingests visualizes, and analyzes metrics, traces, histograms and span logs. So you can resolve incidents faster across cloud applications, correlated with the cloud infrastructures views.
Microsoft developer framework with tools and libraries for building any type of app, including web, mobile, desktop, gaming, IoT, cloud, and microservices. Key Resources:
When you would to install K8s deployment or any other K8s images which pulls dependent images from public Internet. Your Kubernetes cluster running on air-gapped environment can’t download any image from public repository (dockerhub, docker.io, gcr etc). You need to pull it first on bootstrap VM where public internet connectivity is there, then tag it and push it to your local image Harbor. Your K8s cluster will pick images from the local Harbor only. Whenever you have tom install any K8s deployable, you need to manually change deployment manifest and replace image path from public to local repo harbor/jFrog etc.
# Pull from public image registry
docker pull metallb/speaker:v0.9.3

# Tag it with your Harbor host
docker tag metallb/speaker:v0.9.3 $HARBOR_HOST/library/metallb/speaker:v0.9.3

#Push to local image registry harbor/jFrog
docker push $HARBOR_HOST/library/metallb/speaker:v0.9.3

#Change image name in your K8s deployment manifest. You are all set!
$ vi metallb-manifest.yml

apiVersion: apps/v1
kind: Deployment
metadata:
  name: dotnetcore-app-deployment
  namespace: default
spec:
  securityContext:
    runAsUser: 0
  selector:
    matchLabels:
      app: dotnetcore-demo-app
  replicas: 3 # tells deployment to run N pods matching the template
  template: # create pods using pod definition in this template
    metadata:
      labels:
        app: dotnetcore-demo-app
    spec:
      containers:
      - name: dotnetcore-demo-app
        image: harbor.vmwaredc.com/library/dotnet-aspnet-sample
        ports:
        - containerPort: 9080
          name: server

$ kubectl apply -f metallb-manifest.yml
Note: Helm package installable really won’t work on air gapped env, because it tries to pull images from public Internet. You need to refer manifesy yml files only, becuase you haver to chnage the image registry server path before running it on K8s cluster.
In this blog, I will cover WaveFront APM community and enterprise edition. It’s a SAAS based cloud service. I will explain security aspects in detail when transmitting monitoring data from organization’s on-prem, private and public clouds. WaveFront Doesn’t send application logs and user data to SAAS cloud. You can add a WaveFront proxy to mask and filter data based on organization’s security policy.
To know fundamentals and other information about WaveFront and it’s technical architecture, please read my other blog-
Wavefront is secured by design. It only uses these monitoring data from organization’s on-prem data centers/cloud Availability zones (AZs).
Metrices
Traces & Spans
Histogram
There are multiple ways to protect privacy of data on SAAS cloud when data is transmitted from applications and infrastructure servers to the cloud. It’ SAFE to use.
Secure your data with WaveFront Proxy
Wavefront provides these features to secure your data when monitoring your apps/Infra:
Note: It also works on-air gapped environment (Offline with No Internet connectivity). You need to setup a separate VM with public Internet connection which will have a WaveFront (PO) Proxy running. WaveFront agents will push all stats Kubernetes and VM clusters to main WaveFront SAAS cloud and telemetry data will be transmitted from this VM/BM machine to WaveFront cloud SAAS.
Secure By Design
WaveFront does’t read and transmit application, user and database logs and send application logs.
All local matrices data will be stored at WaveFront Proxy with local persistence/databases
Intrusion detection & response
Securely stores username/password information
Does NOT collect information about individual users
Do NOT install agents that collect user information NONE of the built-in integrations collect user information
Currently uses AWS to run the Wavefront service and to store customer application data The AWS data centres incorporate physical protection against environmental risks
The service is served from a single AWS region spread across multiple availability zones for failover
All incoming and outgoing traffic is encrypted. Wavefront customer environments are isolated from each other. Data is stored on encrypted data volumes.
Wavefront customer environments are isolated from each other.
Data is stored on encrypted data volumes.
Wavefront development, QA, and production use separate equipment and environments and are managed by separate teams.
Customers retain control and ownership of their content. It doesn’t replicate customer content unless the customer asks for it explicitly.
User and role based Security – Authentication and Authorization
User & service account Authentication (SSO, LDAP, SAML, MFA). For SSO, it supports Okta, Google ID, AzureAD. User must be authenticated using login credentials and API call also authenticated thru secure auto expiry token.
Authentication using secret token & authorization (RBAC, ACL)
It supports user role and service account also
Roles & groups access management
Users in different teams inside the company can authenticate to different tenants and cannot access the other tenant’s data.
Wavefront supports multi-level authorization:
Roles and permissions
Access control
Wavefront supports a high security mode where only the object creator and Super Admin user can view and modify new dashboards.
If you use the REST API, you must pass in an API token and must also have the necessary permissions to perform the task, for example, Dashboard permissions to modify dashboards.
If you use direct ingestion you are required to pass in an API token and most also have the Direct Data Ingestion permission.
How it protects user data
Mask the monitoring data with different name to maintain privacy
WaveFront agent runs at VMs which captures the data and send to WaveFront Proxy first, where filtering/masking logic can be applied, then filtered/masked data are being transmitted to WaveFront SAAS cloud for analytics and dashboards
It also provides separate private cloud/separate physical VM boxes to store customer’s data securely
It isolates customer’s data on SAAS cloud and never expose to other customers
Data can be filtered before sending to WaveFront SAAS server
Secure transit over Internet with HTTPS/SSL
Data is stored on encrypted data volumes
Protect all data traffic with TLS (Transport Layer Security) and HTTPS